
Is your yard a bumpy, uneven mess? Do you dream of a smooth, flat surface for playing, gardening, or simply enjoying the outdoors? Yard leveling is the process of making your lawn flat and even. This guide will show you how to achieve a perfect yard with easy, step-by-step instructions. You can definitely do this yourself with some effort!
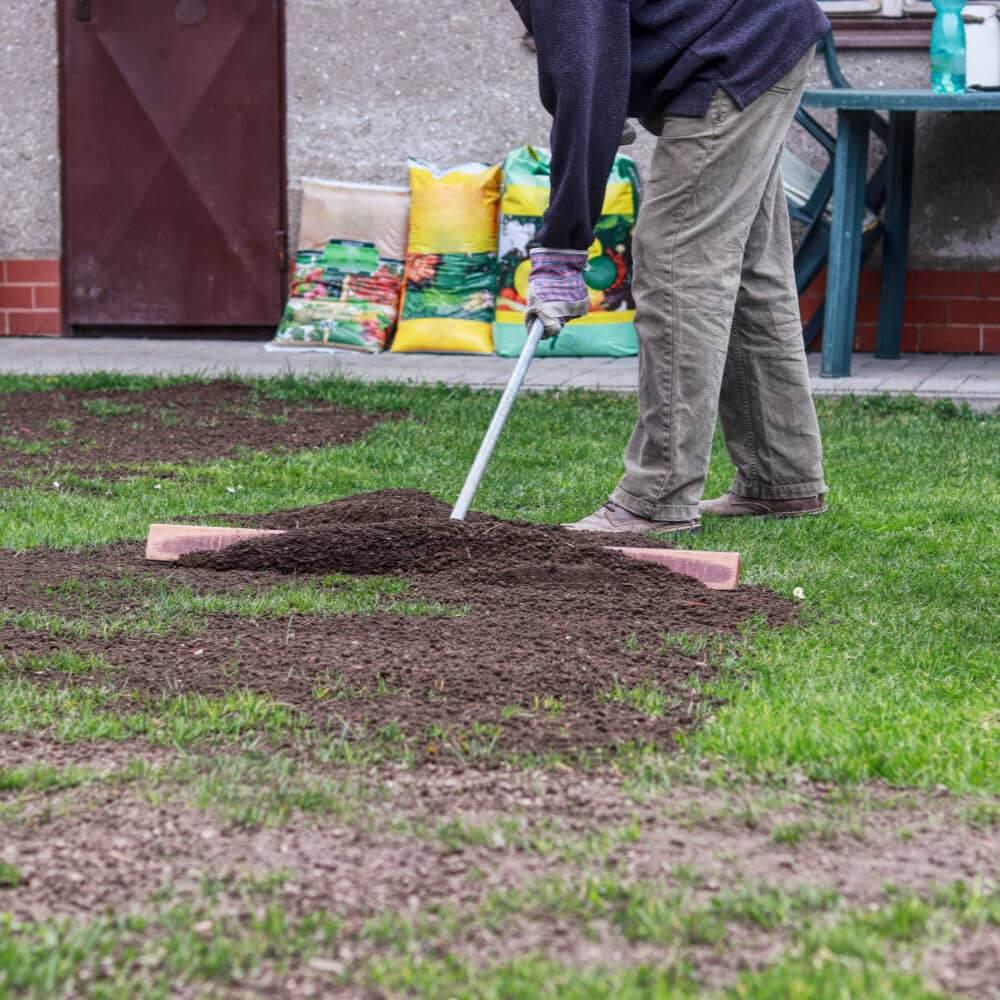
Image Source: dam.thdstatic.com
Why Level Your Yard?
A level yard offers many benefits beyond just aesthetics. It improves drainage, preventing water from pooling in low spots, which can lead to root rot and disease in your grass. It also makes mowing easier and safer, and it’s essential for preparing your lawn for sod or seed. For many, fixing bumpy lawn is the first step to enjoying their outdoor space to its fullest.
Getting Started: Tools and Materials
Before you begin, gather your tools and materials. Having everything ready will make the job much smoother.
Essential Tools
- Shovel: A sturdy flat-nosed shovel is best for spreading dirt. A spade is also useful for edging and digging.
- Rake: A metal rake is crucial for smoothing and gathering debris. A landscape rake or a grading rake is even better for larger areas.
- Wheelbarrow: To transport dirt, soil, or compost.
- Level: A long spirit level (4-6 feet) or a laser level for checking flatness.
- Measuring Tape: For assessing uneven areas.
- Garden Hose with Sprinkler: For watering after you’re done.
- Work Gloves: To protect your hands.
- Sturdy Footwear: For safety and comfort.
- Optional but Helpful:
- Power Tiller: If you’re dealing with very compacted soil or need to incorporate a lot of amendments.
- Tamper: To compact the soil in low spots, preventing settling.
- Lawn Leveling Kit: These kits often include a drag mat or leveling tool designed specifically for spreading soil evenly.
Materials
- Dirt for Leveling Yard: The type of soil you need depends on your existing lawn and the depth of the leveling required.
- Topsoil: This is the most common choice for filling low spots and general leveling. Look for screened topsoil for a finer texture.
- Compost: Can be mixed with topsoil for added nutrients, especially if you plan to reseed.
- Sand: In some cases, a mix of topsoil and sand can help improve drainage, but be cautious with pure sand as it can sometimes exacerbate drainage issues if not used correctly.
- Grass Seed or Sod: If you’re removing existing grass or seeding new areas.
The Best Way to Level Your Yard: Step-by-Step
Achieving a smooth, level lawn is a process that requires patience and consistent effort. Follow these steps for the best results.
Step 1: Assess Your Yard’s Unevenness
Walk your yard and identify all the low spots and high spots. Mark them with stakes or flags. This visual assessment helps you understand the scope of the project. You can also use your level and shovel to check how significant the dips and bumps are. Is it just minor imperfections, or are there areas where water collects?
Step 2: Decide Your Approach: Filling Low Spots or Removing High Spots
Your strategy depends on the type of unevenness.
- Filling Low Spots: This is the most common approach. You’ll add soil to the dips.
- Removing High Spots: If you have significant mounds, you might need to remove some soil. This is more labor-intensive.
- Combination: Most yards will require a bit of both.
Step 3: Prepare the Area
- Mow the Grass: Mow the entire area to be leveled as short as possible. This makes it easier to work and see the contours of the land.
- Remove Debris: Clear away any rocks, branches, weeds, or other debris.
- Remove Sod (If Necessary): If you are leveling a significant area or removing high spots, you may need to remove the existing sod. You can use a sod cutter or a sharp spade for this. Save the sod if you plan to reuse it.
Step 4: Filling Low Spots
This is where the bulk of the yard leveling work happens.
4.1 Addressing Minor Low Spots
For small dips:
- Gather Your Dirt: Use your wheelbarrow to bring the dirt for leveling yard to the low spot.
- Spread the Dirt: Don’t dump all the dirt in one pile. Spread it evenly across the low area using your shovel and rake.
- Layering is Key: For deeper low spots, it’s better to add soil in layers of 1-2 inches at a time. This prevents settling and allows the soil to compact naturally.
- Rake Smooth: Use your rake to spread the soil and smooth it out. Gently rake in different directions to ensure an even surface.
- Compact (Optional but Recommended): Lightly tamp down the soil with your feet or a tamper. This helps prevent the area from sinking later.
- Repeat: Continue adding soil and raking until the low spot is flush with the surrounding ground.
4.2 Tackling Larger Low Spots or Preparing Lawn for Sod
For larger areas or when preparing lawn for sod, a more systematic approach is needed.
- Use a Level: Place your long level across the area to gauge the depth of the low spot.
- Spread and Smooth: Add your dirt for leveling yard gradually. Use a landscape rake or a specialized leveling tool (like those found in a lawn leveling kit) to pull the soil across the area. This acts like a giant squeegee, spreading the dirt evenly.
- Work in Sections: If you have a large area, break it down into manageable sections.
- Water Lightly: After spreading a layer of soil, lightly water the area. This helps settle the soil and reveals any remaining low spots you may have missed.
- Add More Soil: Continue adding and raking soil, checking with your level as you go, until the entire area is smooth and even. Aim for a consistent grade.
Step 5: Addressing High Spots
If you have significant mounds:
- Mark the High Area: Clearly mark the elevated section.
- Remove Excess Soil: Use your shovel to carefully scrape away soil from the top of the mound, working from the center outwards.
- Spread the Removed Soil: Use the removed soil to fill in nearby low spots.
- Smooth and Level: Once the high spot is reduced, rake the area smooth. If you removed sod, you can either re-lay it or use the leveled ground for new seed or sod.
- Check for Level: Use your level to ensure the area is now even with the surrounding ground.
Step 6: Final Raking and Smoothing
Once all low and high spots are addressed, give the entire area a final, thorough raking. This ensures a consistent surface and removes any remaining small imperfections. Aim to smooth out yard completely.
Step 7: Watering
After leveling, lightly water the entire area. This helps settle the soil further and prepares it for grass. If you plan to reseed, water gently so as not to wash away the newly spread soil or seeds.
Step 8: Seeding or Sodding
- Seeding: If you’ve leveled a large area or are starting from scratch, spread grass seed according to the manufacturer’s instructions. Rake lightly to incorporate the seed into the top layer of soil. Keep the area consistently moist until the grass is established.
- Sodding: If you’ve meticulously leveled your yard and are preparing lawn for sod, lay down new sod pieces tightly together. Water immediately and thoroughly.
Important Considerations for Yard Leveling
The process of regrading lawn requires attention to detail. Here are some tips to make the job easier and more effective.
Timing is Everything
The best time to level your yard is typically in the spring or fall when the weather is mild. This allows new grass to establish easily without the stress of extreme heat or cold. Avoid leveling during very dry or very wet periods.
Soil Compaction
If you’re filling deep holes or have areas with particularly poor soil, consider tilling the area first. This breaks up compacted soil and allows new soil to integrate better. If you’ve added a lot of soil, especially in low spots, compacting it gently will prevent it from sinking excessively over time.
Drainage Patterns
As you level your yard, always consider the natural drainage of your property. You don’t want to create a situation where water now pools in a different area. Ideally, you want a very slight, consistent slope away from your house and any structures.
The “Inch Rule” for Low Spots
A common guideline for filling low spots yard is:
- Less than 1 inch: Can often be corrected with a thin layer of compost or topsoil and raking.
- 1-4 inches: Requires adding topsoil in layers, allowing for settling between each layer.
- More than 4 inches: May require removing sod, adding soil, compacting, and then reseeding or resodding. For very large changes or significant grading, you might consider professional help.
Lawn Leveling Kits
A lawn leveling kit can be a worthwhile investment for larger projects or frequent maintenance. These kits often include a drag mat or a leveling bar that attaches to a riding mower or ATV. These tools are designed to evenly distribute soil or sand across the lawn, making the DIY yard grading process much more efficient and effective.
Over-Seeding Existing Lawns
If your lawn is generally good but has some minor bumps or thin patches, you can level and overseed in one process.
1. Aerate the lawn first to help the new soil and seed penetrate.
2. Spread a thin layer of compost or topsoil.
3. Use a rake to work the soil into the aeration holes and smooth out minor imperfections.
4. Broadcast grass seed over the area.
5. Rake lightly and water.
Regrading Lawn for Better Drainage
Regrading lawn is a more extensive process than simple spot leveling. It involves reshaping the entire landscape to improve water flow. If your yard has significant drainage problems, such as water pooling against your house foundation or creating swampy areas, a more comprehensive regrading project might be necessary. This often involves:
- Identifying the source of the problem: Is it simply unevenness, or is there an underlying issue with the land’s contour?
- Creating a slight slope: The goal is to create a gentle slope (usually 1-2% grade) away from structures.
- Using more soil: Regrading often requires moving larger quantities of soil.
- Potentially installing drainage systems: For severe issues, French drains or other drainage solutions might be needed.
If your DIY yard grading needs are extensive, it’s wise to consult with a landscaping professional to ensure the job is done correctly and doesn’t create new problems.
Maintaining Your Level Yard
Once you’ve achieved a beautiful, level lawn, regular maintenance will keep it that way.
- Top Dressing: Periodically apply a thin layer of compost or topsoil (about 1/4 inch) to the lawn and rake it in. This helps fill any minor depressions that develop over time and improves soil health.
- Promptly Fill Holes: If small holes or dips appear (e.g., from animal activity or wear and tear), fill them immediately with soil to prevent them from becoming larger problems.
- Aeration: Aerating your lawn annually helps prevent soil compaction and keeps your soil healthy, which aids in maintaining a level surface.
Frequently Asked Questions (FAQ)
Q1: What is the best way to level a bumpy lawn?
A1: The best way to level a bumpy lawn is to add good quality topsoil to the low spots in thin layers, raking and compacting each layer before adding more, until the area is flush with the surrounding ground. For high spots, remove excess soil and use it to fill nearby low areas.
Q2: Can I level my yard myself?
A2: Yes, you can level your yard yourself. For minor unevenness, it’s a manageable DIY project. For extensive regrading or significant drainage issues, professional help might be advisable.
Q3: How much dirt do I need for leveling my yard?
A3: The amount of dirt needed depends on the size of the area you’re leveling and the depth of the dips. It’s best to estimate based on the volume of the low spots. You can buy bags of topsoil for smaller areas or bulk delivery for larger projects.
Q4: How deep can I fill a low spot in my yard?
A4: You can fill low spots up to 4 inches deep by adding soil in thin layers (1-2 inches at a time), allowing for settling in between. For deeper depressions, it’s best to remove the existing grass, add soil, compact it, and then reseed or resod. Filling too deep without proper preparation can suffocate the grass roots.
Q5: How do I prevent grass from dying when filling low spots?
A5: To prevent grass from dying when filling low spots, add soil in layers of 1-2 inches at a time, especially if the depression is more than an inch deep. Allow each layer to settle. If you’re filling over existing grass, use a thin layer of compost mixed with topsoil. Avoid burying the grass crown. If filling a large area, consider removing the sod first.
Q6: When is the best time to level my yard?
A6: The best time to level your yard is during the spring or fall when the weather is mild. This allows new grass to establish easily without being stressed by extreme heat or cold.
By following these steps, you can transform your uneven yard into a smooth, functional, and beautiful space. Happy leveling!