
What is lawn edging? Lawn edging is the clean, defined line created between your lawn and other landscape elements like garden beds, pathways, or driveways. Can I edge my lawn myself? Yes, you absolutely can edge your lawn yourself with the right tools and techniques! Who is lawn edging for? Anyone who wants a neat, polished look for their yard.
A well-edged lawn makes a huge difference. It’s like putting a frame around a beautiful picture. It separates your grass from garden beds, walkways, and driveways, giving your yard a tidy and professional look. This guide will show you how to achieve those stunning results. We’ll explore different lawn edging ideas, the best lawn edger options, and the steps involved in trenching a lawn for that perfect crisp line.
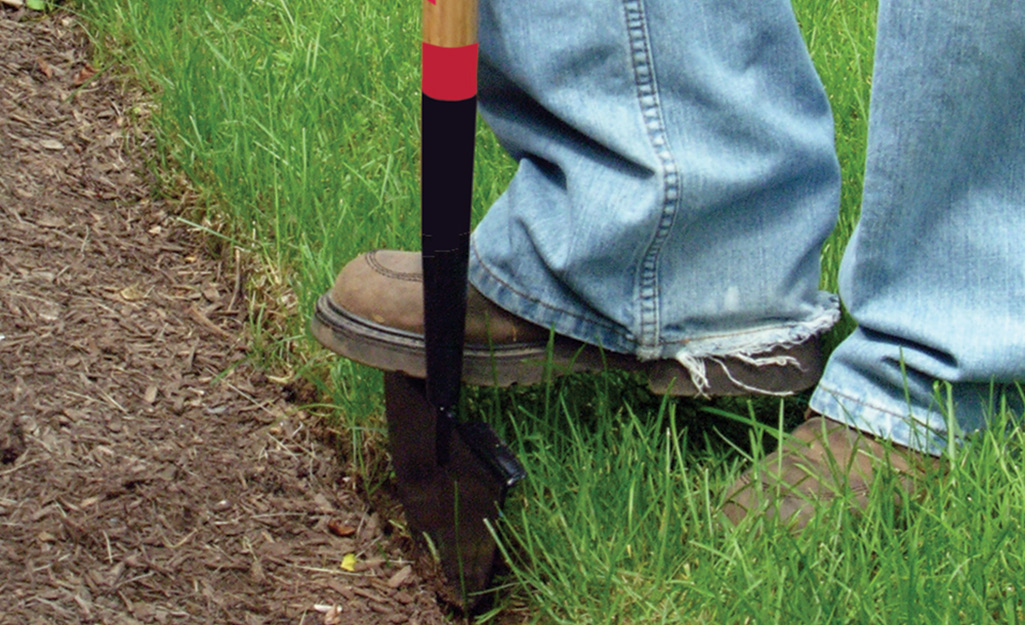
Image Source: contentgrid.homedepot-static.com
Why Edging Your Lawn Matters
Edging isn’t just about looks. It serves practical purposes too:
- Prevents Grass Spread: Grass naturally wants to grow outwards. Edging stops it from creeping into your flower beds or onto your paths, keeping everything neat.
- Improves Drainage: A clean edge can help direct water away from sensitive areas, preventing waterlogging.
- Enhances Visual Appeal: A sharp edge makes your lawn look meticulously maintained, boosting your home’s curb appeal.
- Defines Spaces: It clearly separates different areas of your garden, making your landscape design more impactful.
Choosing Your Lawn Edging Style
There are many lawn edging ideas to consider, each offering a different look and feel. Your choice will depend on your budget, the time you want to invest, and the overall style of your garden.
Natural Edging (Trenching)
This is a classic and effective method. It involves creating a shallow trench along the border of your lawn.
- Pros: Very natural look, relatively inexpensive if you have the tools, effective at preventing grass spread.
- Cons: Requires regular maintenance, can be labor-intensive.
Hardscape Edging
These are more permanent solutions that add structure and visual interest.
- Brick Lawn Edging:
- Pros: Timeless appeal, durable, can be laid in various patterns.
- Cons: Can be costly, requires careful installation, can be challenging to mow against.
- Stone Lawn Edging:
- Pros: Natural, rustic look, very durable, can match existing stonework.
- Cons: Can be expensive, installation can be heavy work, irregular shapes might be tricky to edge against.
- Metal Lawn Edging:
- Pros: Sleek, modern look, very durable, thin profile allows for easy mowing.
- Cons: Can be more expensive upfront, can rust over time if not treated, sharp edges require care during installation.
- Plastic Lawn Edging:
- Pros: Inexpensive, lightweight, easy to install, flexible for curves.
- Cons: Less durable than other options, can become brittle in sunlight over time, not as aesthetically pleasing to some.
Other Landscape Edging Options
Beyond the common materials, you might also consider:
- Wooden Edging: Logs, stakes, or treated lumber can create a charming, rustic border. However, wood will eventually rot and require replacement.
- Concrete Edging: Poured concrete can create a very strong and permanent border, often molded into decorative shapes. This is typically a professional job.
- No-Mow Zones: In some cases, you might choose to replace grass with ground cover, mulch, or gravel for a maintenance-free edge.
Tools of the Trade: The Best Lawn Edger Options
To achieve that crisp edge, you’ll need the right tools. The best lawn edger for you depends on the size of your lawn, the type of edging you’re doing, and your personal preference.
Manual Lawn Edger
A manual lawn edger is a simple, effective tool for basic edging.
- Types:
- Half-Moon Edger: This tool has a sharp, curved blade. You push it into the ground to cut a clean line. It’s great for small areas and precision work.
- Edging Shears: These look like large scissors. They are excellent for trimming stray grass blades and making fine adjustments along existing edges.
- Pros: Inexpensive, no fuel or electricity needed, good for precise control.
- Cons: Requires physical effort, can be slow for large areas, may not be effective for deep edging or tough soil.
Power Lawn Edger
For larger lawns or tougher jobs, a power lawn edger is a game-changer.
- Types:
- Electric Edgers/Trimmers: These are lightweight and easy to use, ideal for smaller to medium-sized yards. They come in corded and battery-powered versions.
- Corded: Unlimited run time but limited by cord length.
- Battery-Powered: Offers freedom of movement but has a limited run time.
- Gas-Powered Edgers: These are the most powerful option, suitable for large properties and challenging conditions. They are heavier and require more maintenance.
- Edger Attachments for Trimmers: Many string trimmers can be converted into edgers with a special attachment. This is a cost-effective option if you already own a compatible trimmer.
- Electric Edgers/Trimmers: These are lightweight and easy to use, ideal for smaller to medium-sized yards. They come in corded and battery-powered versions.
- Pros: Faster, less physical effort, can create deeper, cleaner edges, suitable for larger areas.
- Cons: More expensive, require fuel or electricity, can be noisy, require more maintenance (especially gas models).
Other Useful Tools
- Shovel: A flat-edge shovel is useful for removing sod or digging a trench.
- Garden Hose: Used for marking out your edge line and cleaning up.
- Gloves: Protect your hands.
- Safety Glasses: Essential when using power tools.
- Wheelbarrow: For removing excavated soil or sod.
- Yard Rake: For clearing debris.
Mastering the Art of Trenching a Lawn
Trenching a lawn is the core skill for creating a natural-looking, defined edge. Here’s how to do it right:
Step 1: Planning Your Edge
- Mark Your Line: Before you cut, decide exactly where you want your edge to be. Use a garden hose, string, or spray paint to lay out the desired line. Consider gentle curves for a more natural look, or straight lines for a formal appearance.
- Consider Mowing: Think about how you’ll mow your lawn. You need enough space to get your mower wheels close to the edge without hitting it.
- Visualize the Depth: For trenching, you typically want a trench about 2-4 inches deep and 2-4 inches wide. This creates a clear visual separation and prevents grass from easily overgrowing.
Step 2: Creating the Trench
Using a Manual Lawn Edger:
- Position the Edger: Place the half-moon edger along your marked line.
- Push and Cut: Press down firmly with your foot on the handle to push the blade into the soil.
- Angle and Saw: Angle the edger slightly and “saw” back and forth to cut through the sod and soil.
- Remove Soil/Sod: Use the edger itself or a shovel to scoop out the loosened soil and sod. Place it in a wheelbarrow for disposal or use it elsewhere in your garden.
- Repeat: Move along your marked line, repeating the process.
Using a Power Lawn Edger:
- Set the Depth: Adjust your power edger to the desired cutting depth (usually 2-4 inches).
- Guide the Edger: Turn on the edger and slowly guide it along your marked line. Let the tool do the work; don’t force it.
- Remove Debris: The edger will typically throw the cut sod and soil to one side. Clear this away with a shovel or rake.
- Overlap and Refine: Make sure to overlap your passes slightly to ensure a continuous cut. You might need to go over particularly tough spots a second time or use a shovel for stubborn roots.
Using a Shovel:
- Cut the Line: If you don’t have an edger, a sharp, flat-edge shovel can be used. Make a straight cut along your marked line.
- Dig the Trench: Dig down and remove the sod and soil to create your trench. This is more laborious but effective.
Step 3: Refining the Edge
- Clean Up: Use your edger or shears to neaten any rough edges or stray grass blades.
- Remove Debris: Rake away any loose soil or grass clippings from the trench and surrounding areas.
- Water: Lightly water the area. This helps settle the soil and shows you where any final touch-ups might be needed.
Installing Hardscape Edging
If you’ve opted for more permanent landscape edging, the installation process will be different.
Brick Lawn Edging
- Prepare the Trench: Dig a trench that is slightly wider than your bricks and deep enough to accommodate them, plus a layer of sand or gravel for drainage.
- Add Base Material: Lay down a layer of paver base or gravel in the trench. Compact it well.
- Lay the Bricks: Place the bricks in the trench. You can lay them flat, on their sides, or even upright for a more pronounced edge. Ensure they are level.
- Secure with Sand/Mortar: Fill the gaps between bricks with paver sand and sweep it in. For a very permanent edge, you might use mortar, but this requires more skill.
- Backfill: Backfill soil behind the bricks on the lawn side to hold them in place.
Stone Lawn Edging
- Dig and Level: Dig a trench and ensure the base is firm and level.
- Select Stones: Choose stones of similar size and shape for a uniform look, or mix and match for a more natural, random pattern.
- Set the Stones: Place the stones snugly together in the trench. Larger stones might require more digging to seat them securely.
- Backfill: Fill in behind the stones with soil.
Metal Lawn Edging
- Dig a Shallow Trench: Metal edging is usually installed just below the soil surface. Dig a shallow trench along your marked line.
- Insert the Edging: Slide the metal panels into the trench. Most metal edging systems have interlocking components.
- Secure with Stakes: Use the provided stakes to hammer the edging firmly into the ground, ensuring it’s vertical and stable.
- Backfill: Fill in the trench around the edging.
Plastic Lawn Edging
- Dig a Trench: Dig a trench that is deep enough to bury most of the plastic edging, leaving the desired amount exposed.
- Lay the Edging: Place the plastic edging into the trench.
- Stake It Down: Use the provided plastic stakes to secure the edging every few feet, driving them through the edging and into the ground.
- Backfill: Fill in the trench with soil.
Maintenance for Long-Lasting Edges
Even the best-edged lawn needs a little upkeep.
- Regular Trimming: After mowing, use your edging shears or a string trimmer to tidy up any grass that has grown over the edge.
- Weeding: Keep the edges free of weeds, which can quickly undermine the clean look.
- Re-edging: For natural trenches, you’ll need to re-cut the edge every few weeks or months, depending on your grass growth rate.
- Check Hardscapes: Periodically check hardscape edging to ensure stones or bricks haven’t shifted and fill any gaps with sand.
Lawn Edging Ideas: A Quick Reference
| Edging Type | Best For | Durability | Cost | Maintenance |
|---|---|---|---|---|
| Natural Trench | Crisp, clean lines; budget-friendly | Moderate | Low | Moderate |
| Brick | Formal, classic look; garden beds, pathways | High | Moderate | Low |
| Stone | Natural, rustic look; garden beds, pathways | High | Moderate | Low |
| Metal | Modern, sleek look; minimal intrusion | Very High | Moderate | Very Low |
| Plastic | Budget-conscious; curves, quick installation | Low-Moderate | Low | Low |
| Wood | Rustic, informal look; garden borders | Low-Moderate | Low-Moderate | Moderate |
| Concrete | Permanent, sculpted edges; walkways, driveways | Very High | High | Very Low |
Frequently Asked Questions (FAQ)
Q1: How often should I edge my lawn?
A: For natural trench edging, you’ll likely need to re-edge every 2-4 weeks during peak growing season. Hardscape edging requires much less frequent attention, mainly just tidying up grass growth with shears.
Q2: Can I edge my lawn with a string trimmer?
A: Yes, many string trimmers can be fitted with an edging attachment, or you can carefully use the side of the trimmer head to cut a shallow edge. However, a dedicated edger usually provides a cleaner, deeper cut.
Q3: What is the easiest way to edge a lawn?
A: For ease of use, a battery-powered electric edger or a manual half-moon edger for smaller areas is generally considered easiest. If you have a very large property, a gas-powered edger is more efficient.
Q4: Does lawn edging prevent weeds?
A: A well-maintained edge, especially a deep trench or a hardscape barrier, can help prevent grass from spreading into garden beds, which in turn can reduce weed competition. It doesn’t stop weeds from growing in place, however.
Q5: What’s the difference between edging and trimming?
A: Trimming usually refers to cutting grass that’s grown too long around obstacles or edges using a string trimmer. Edging specifically refers to creating that clean, defined border line between different landscape areas.
Achieving stunning lawn edges is within your reach. By choosing the right tools and techniques, you can transform your yard from ordinary to extraordinary, one crisp line at a time. Happy edging!