
Can you level a lawn yourself? Yes, absolutely! Leveling your lawn is a manageable DIY project that can dramatically improve its appearance and functionality. You can tackle uneven spots, repair sunken areas, and create a smooth, inviting surface for outdoor activities.
A beautiful, even lawn is the envy of any neighborhood. It’s not just about aesthetics; a level lawn is safer for walking, playing, and mowing. It also helps with water drainage, preventing puddles and promoting healthier grass growth. If your lawn is riddled with bumps, dips, or sunken spots, it’s time to consider lawn leveling. This guide will walk you through everything you need to know to achieve a perfectly level lawn with easy DIY tips.
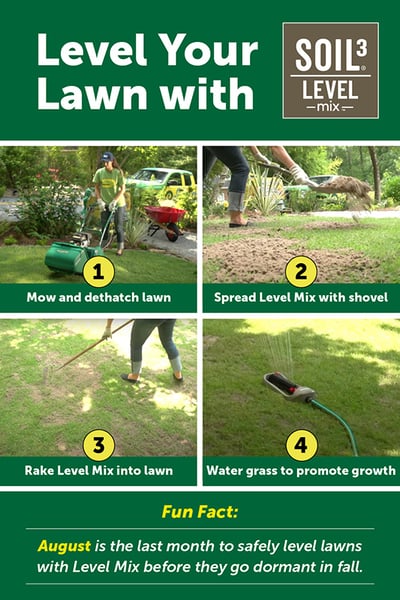
Image Source: info.supersod.com
Why Level Your Lawn?
Before we dive into the “how,” let’s look at the “why.” A level lawn offers several key benefits:
- Aesthetics: A smooth, even surface looks much better than a bumpy or uneven one.
- Safety: Uneven areas can be tripping hazards, especially for children and the elderly.
- Mowing: A level lawn makes mowing easier and more efficient, preventing scalping or uneven cuts.
- Water Drainage: Low spots can collect water, leading to drowning grass, fungal diseases, and mosquito breeding grounds. High spots can dry out faster.
- Playability: It’s simply more enjoyable to play games on a flat surface.
- Overall Health: Better drainage and uniform water distribution contribute to healthier grass.
Identifying Lawn Problems
The first step to leveling your lawn is to identify the specific issues. Walk across your lawn, paying close attention to how your feet land.
Common Lawn Unevenness
- Sunken Spots: These are depressions in the lawn, often caused by soil settling, tree root decay, or animal burrows. These areas can collect water.
- Bumps and Humps: These can be caused by soil heaving from frost, molehills, or compacted soil pushing upwards.
- Slopes: While some slope is natural and good for drainage, excessive or uneven slopes can be problematic.
- General Irregularity: Over time, the entire lawn might develop a generally uneven surface without distinct high or low points.
When is the Best Time to Level Lawn?
The best time to level lawn is generally during the spring or fall. These seasons offer moderate temperatures that are ideal for grass to recover and establish itself after the disturbance. Avoid leveling during periods of extreme heat or drought, as this will stress the grass. Also, steer clear of times when the ground is waterlogged, as you’ll create more problems than you solve.
- Spring: Ideal for preparing the lawn for the growing season. The grass is actively growing and can recover quickly.
- Fall: Excellent for overseeding leveled areas. The cooler temperatures and increased moisture help new grass establish before winter.
Lawn Leveling Techniques: A Step-by-Step Guide
Leveling your lawn can be done in stages, depending on the severity of the unevenness. For minor imperfections, a simple top-dressing might suffice. For more significant issues, you might need to lift sod or bring in more substantial amounts of soil.
1. Preparing Your Lawn for Leveling
Before you start any leveling work, ensure your lawn is prepared:
- Mow: Mow your lawn to a shorter height. This makes it easier to work with the turf and soil.
- Remove Debris: Clear the lawn of any rocks, sticks, leaves, or other debris.
- Mark Uneven Areas: Use stakes or flags to clearly mark the areas that need attention.
2. Repairing Sunken Spots Lawn
Sunken spots are often easier to fix than widespread bumps.
Method 1: Top-Dressing Sunken Spots
This is the simplest approach for shallow dips.
- Gather Materials: You’ll need topsoil for lawn leveling and a rake.
- Fill the Dip: Use a shovel to fill the sunken area with your chosen topsoil. Don’t overfill; aim to bring the area up to the surrounding lawn level.
- Rake Smooth: Use a garden rake to spread the topsoil evenly within the dip.
- Water: Lightly water the area.
- Seed (if necessary): If the topsoil is exposed, you’ll need to reseed the area. Mix grass seed with the topsoil and gently pat it down. Keep the area consistently moist until the grass germinates.
Method 2: Lifting Sod for Deeper Sunken Spots
For deeper depressions, you might need to lift the existing sod, add soil underneath, and then replace the sod.
- Lawn Leveling Tools: You’ll need a spade or a sod cutter, your topsoil, and a rake.
- Lift the Sod: Use a sharp spade or a sod cutter to carefully lift the turf around the sunken area. Try to keep the sod in one piece as much as possible, with a good amount of soil attached. Cut a flap that you can easily lift and fold back.
- Add Topsoil: Fill the sunken spot with topsoil, bringing it up to the level of the surrounding grass.
- Replace Sod: Fold the sod flap back into place.
- Firm and Water: Press the sod down firmly to ensure good soil contact. Water the area thoroughly.
3. Filling Low Spots Lawn
Filling low spots is essentially the same process as repairing sunken spots, but it can apply to more widespread areas of low elevation.
- Assess the Extent: If the entire lawn has a slight tilt, you might need to use a grader blade attachment on a lawn tractor or hire a professional for larger areas. For moderate low spots, the top-dressing method works well.
- Topsoil Application: Spread a thin layer of topsoil for lawn leveling across the low areas. You can use a wheelbarrow and shovel for this.
- Raking: Use a long-handled landscape rake to spread the topsoil evenly. Work the soil into the existing grass. You want to gently cover the grass blades, not smother them.
- Seeding: If the topsoil layer is thick enough to cover a significant portion of the grass blades, you will likely need to overseed the area with new grass seed.
- Watering: Keep the newly leveled and seeded areas consistently moist until the grass is established.
4. Leveling Bumpy Lawn
Dealing with bumps requires a slightly different approach, focusing on removing excess soil or breaking up compacted areas.
Method 1: Raking and Top-Dressing for Minor Bumps
- Tools: A sturdy rake is essential. For tougher bumps, a landscape rake or even a metal debris rake can be helpful.
- Rake Away Excess: For small, raised areas, you can often use a stiff rake to gently scrape away the excess soil. This is more effective if the soil is slightly moist.
- Fill Depressions: As you remove soil from bumps, you’ll likely create small depressions. Fill these with a bit of topsoil.
- Seed and Water: Overseed any bare patches and water well.
Method 2: Addressing Larger Bumps and Heaved Areas
- Tools: Spade, rake, and possibly a roller.
- Loosen the Soil: For significant humps, you may need to use a spade to loosen the soil at the base of the bump.
- Remove Soil: Work the spade around the bump and gently push it down, or carefully dig out excess soil from the top of the bump.
- Level and Fill: Spread the removed soil into adjacent low spots or use it elsewhere. Rake the area smooth.
- Compact: Gently compact the leveled area by walking on it or using a lawn roller. This helps prevent future heaving.
- Seed and Water: If you’ve disturbed a large area, reseed and water diligently.
5. Using a Lawn Leveler Tool
For more extensive leveling projects, investing in or renting a lawn leveling tool can be a game-changer.
Types of Lawn Levelers:
- Lawn Leveling Rakes: These have a long handle and a wide, flat head, often with tines, designed for spreading soil and smoothing surfaces.
- Lawn Leveling Drag Mats: These are typically made of heavy-duty mesh or chains that are pulled behind a lawn tractor or ATV. They are excellent for spreading soil and breaking up clumps across a larger area.
- Spreader Bars: These are often used in conjunction with drag mats to further refine the leveling process.
How to Use a Lawn Leveler:
- Apply Topsoil: Spread a layer of topsoil for lawn leveling across the entire lawn or the affected areas. A broadcast spreader is efficient for this.
- Drag the Leveler: Pull the lawn leveler across the topsoil. Move in a criss-cross pattern (e.g., north-south, then east-west) to ensure even distribution.
- Fill Low Spots: As you drag, the leveler will push soil into the low spots and break up any high spots.
- Rake Excess: Use a regular rake to clean up any excess soil or smooth out any lines left by the leveler.
- Reseed if Necessary: If the topsoil layer is substantial, you’ll need to overseed the lawn.
6. Reseeding Leveled Lawn
After leveling, especially if you’ve removed significant amounts of soil or added new topsoil, reseeding leveled lawn areas is crucial.
- Choose the Right Seed: Select a grass seed blend that matches your existing lawn or is suitable for your climate and soil conditions.
- Prepare the Seedbed: Lightly rake the leveled areas to create a loose seedbed.
- Apply Seed: Use a spreader or spread by hand to apply the seed evenly. Follow the recommended seeding rates on the seed bag.
- Lightly Rake: Gently rake the seed into the top layer of soil.
- Fertilize: Apply a starter fertilizer to give the new seeds the nutrients they need to germinate and grow.
- Water Consistently: This is critical! Keep the seeded areas consistently moist. Water lightly several times a day, especially in warm weather, until the seeds have germinated and the new grass is about an inch tall. Once established, gradually reduce watering frequency but water more deeply.
Important Lawn Leveling Tools
Having the right lawn leveling tools makes the job much easier.
- Shovel: For digging, moving soil, and lifting sod.
- Garden Rake: For smoothing soil and spreading topsoil.
- Landscape Rake (or Thatch Rake): A heavier-duty rake with a wider head, excellent for spreading and leveling larger areas.
- Wheelbarrow: For transporting soil and other materials.
- Sod Cutter (optional): For more professional sod lifting.
- Lawn Leveler/Drag Mat (optional): For large-scale leveling.
- Hose with Sprinkler Attachment: For watering.
- Grass Seed and Starter Fertilizer: For reseeding.
- Measuring Tape: To gauge the depth of dips and bumps.
- Stakes and Flags: To mark problem areas.
Choosing the Right Topsoil for Lawn Leveling
The type of soil you use can significantly impact the success of your leveling project. Topsoil for lawn leveling should be a good quality, screened topsoil.
What to Look For:
- Screened: This means the soil has been run through a screen to remove rocks, roots, and other debris. This ensures a smoother finish.
- Well-Draining: A good mix of sand, silt, and clay is ideal. Avoid heavy clay soils, which can compact and cause drainage issues.
- Nutrient-Rich: Look for topsoil that contains organic matter, which will provide nutrients for your grass.
- Consistent Color: A uniform color can indicate a consistent mix of materials.
Where to Buy:
- Garden Centers: Often sell bagged topsoil, which is convenient for smaller jobs.
- Landscape Supply Yards: Usually offer bulk topsoil delivery, which is more cost-effective for larger projects.
Leveling Uneven Lawn: Common Challenges and Solutions
When leveling uneven lawn, you might encounter a few common challenges.
Challenge 1: Severe Bumps and Dips
- Solution: For extreme unevenness, you may need to remove and replace sod. Dig up large sections of turf, bring in a significant amount of topsoil to fill deep depressions, and then re-lay the sod. For very large areas, consider hiring a professional with grading equipment.
Challenge 2: Compacted Soil
- Solution: If your soil is heavily compacted, leveling will be more difficult. Aeration (using a core aerator) before leveling can help loosen the soil. If you’re adding topsoil, mix it with some compost to improve soil structure.
Challenge 3: Soil Washing Away
- Solution: If you have slopes where soil washes away, consider using a combination of topsoil and compost. You can also use erosion control blankets or netting on steeper slopes after leveling and seeding. Planting ground cover or shrubs on slopes can also help stabilize the soil.
Challenge 4: Uneven Watering After Leveling
- Solution: After leveling, it’s common for water to run off certain areas or pool in others. Observe how your lawn waters. If you notice persistent dry spots or puddles, you may need to make minor adjustments with additional topsoil or soil amendments.
Maintaining Your Newly Leveled Lawn
Once your lawn is level, keeping it that way and ensuring healthy grass growth is key.
- Regular Mowing: Mow at the recommended height for your grass type.
- Proper Watering: Water deeply and infrequently to encourage deep root growth.
- Fertilizing: Feed your lawn with appropriate fertilizers at the right times of the year.
- Aeration and Dethatching: Perform these tasks periodically to prevent soil compaction and thatch buildup, which can lead to unevenness over time.
- Monitor for Issues: Keep an eye out for new bumps, dips, or signs of poor drainage and address them promptly.
FAQ: Your Lawn Leveling Questions Answered
Here are some common questions people have about leveling their lawns:
Q1: How much topsoil do I need for lawn leveling?
A1: The amount of topsoil needed depends on the severity of the unevenness. For shallow dips, a few bags might suffice. For larger areas or deeper depressions, you might need several cubic yards. Measure the area and depth of the low spots to estimate. It’s often better to have a little extra than to run out.
Q2: Can I level my lawn without adding new soil?
A2: For minor bumps, you can sometimes achieve a smoother surface by carefully removing soil from high spots and using it to fill nearby low spots. However, for significant leveling or filling deep sunken areas, adding topsoil for lawn leveling is usually necessary.
Q3: How long does it take for a leveled lawn to settle?
A3: If you’ve reseeded, it will take several weeks for the new grass to establish. The soil itself might settle slightly over time, especially after watering. Be prepared to make minor touch-ups as needed.
Q4: Will leveling my lawn kill the grass?
A4: If done carefully, leveling should not kill your grass. However, adding a thick layer of topsoil (more than 1-2 inches) without reseeding can smother existing grass. The goal is to gradually fill or smooth the areas. If you cover a lot of grass, reseeding is recommended.
Q5: Is it better to level my lawn in spring or fall?
A5: Both are good times, but fall is often preferred for reseeding after leveling. The cooler temperatures and increased natural rainfall in autumn create ideal conditions for new grass seed germination and establishment.
By following these lawn leveling techniques, you can transform your bumpy, uneven lawn into a smooth, beautiful, and functional outdoor space. Remember to choose the right lawn leveling tools, use quality topsoil for lawn leveling, and be patient with the process, especially when reseeding leveled lawn areas. Enjoy your newly perfected lawn!