
Can you plant clover seed in an existing lawn? Yes, you absolutely can plant clover seed in an existing lawn through overseeding, and it’s a fantastic way to improve its overall health and appearance. This guide will delve deep into the world of clover lawns, exploring their numerous advantages and providing a step-by-step approach on how to cultivate your own.
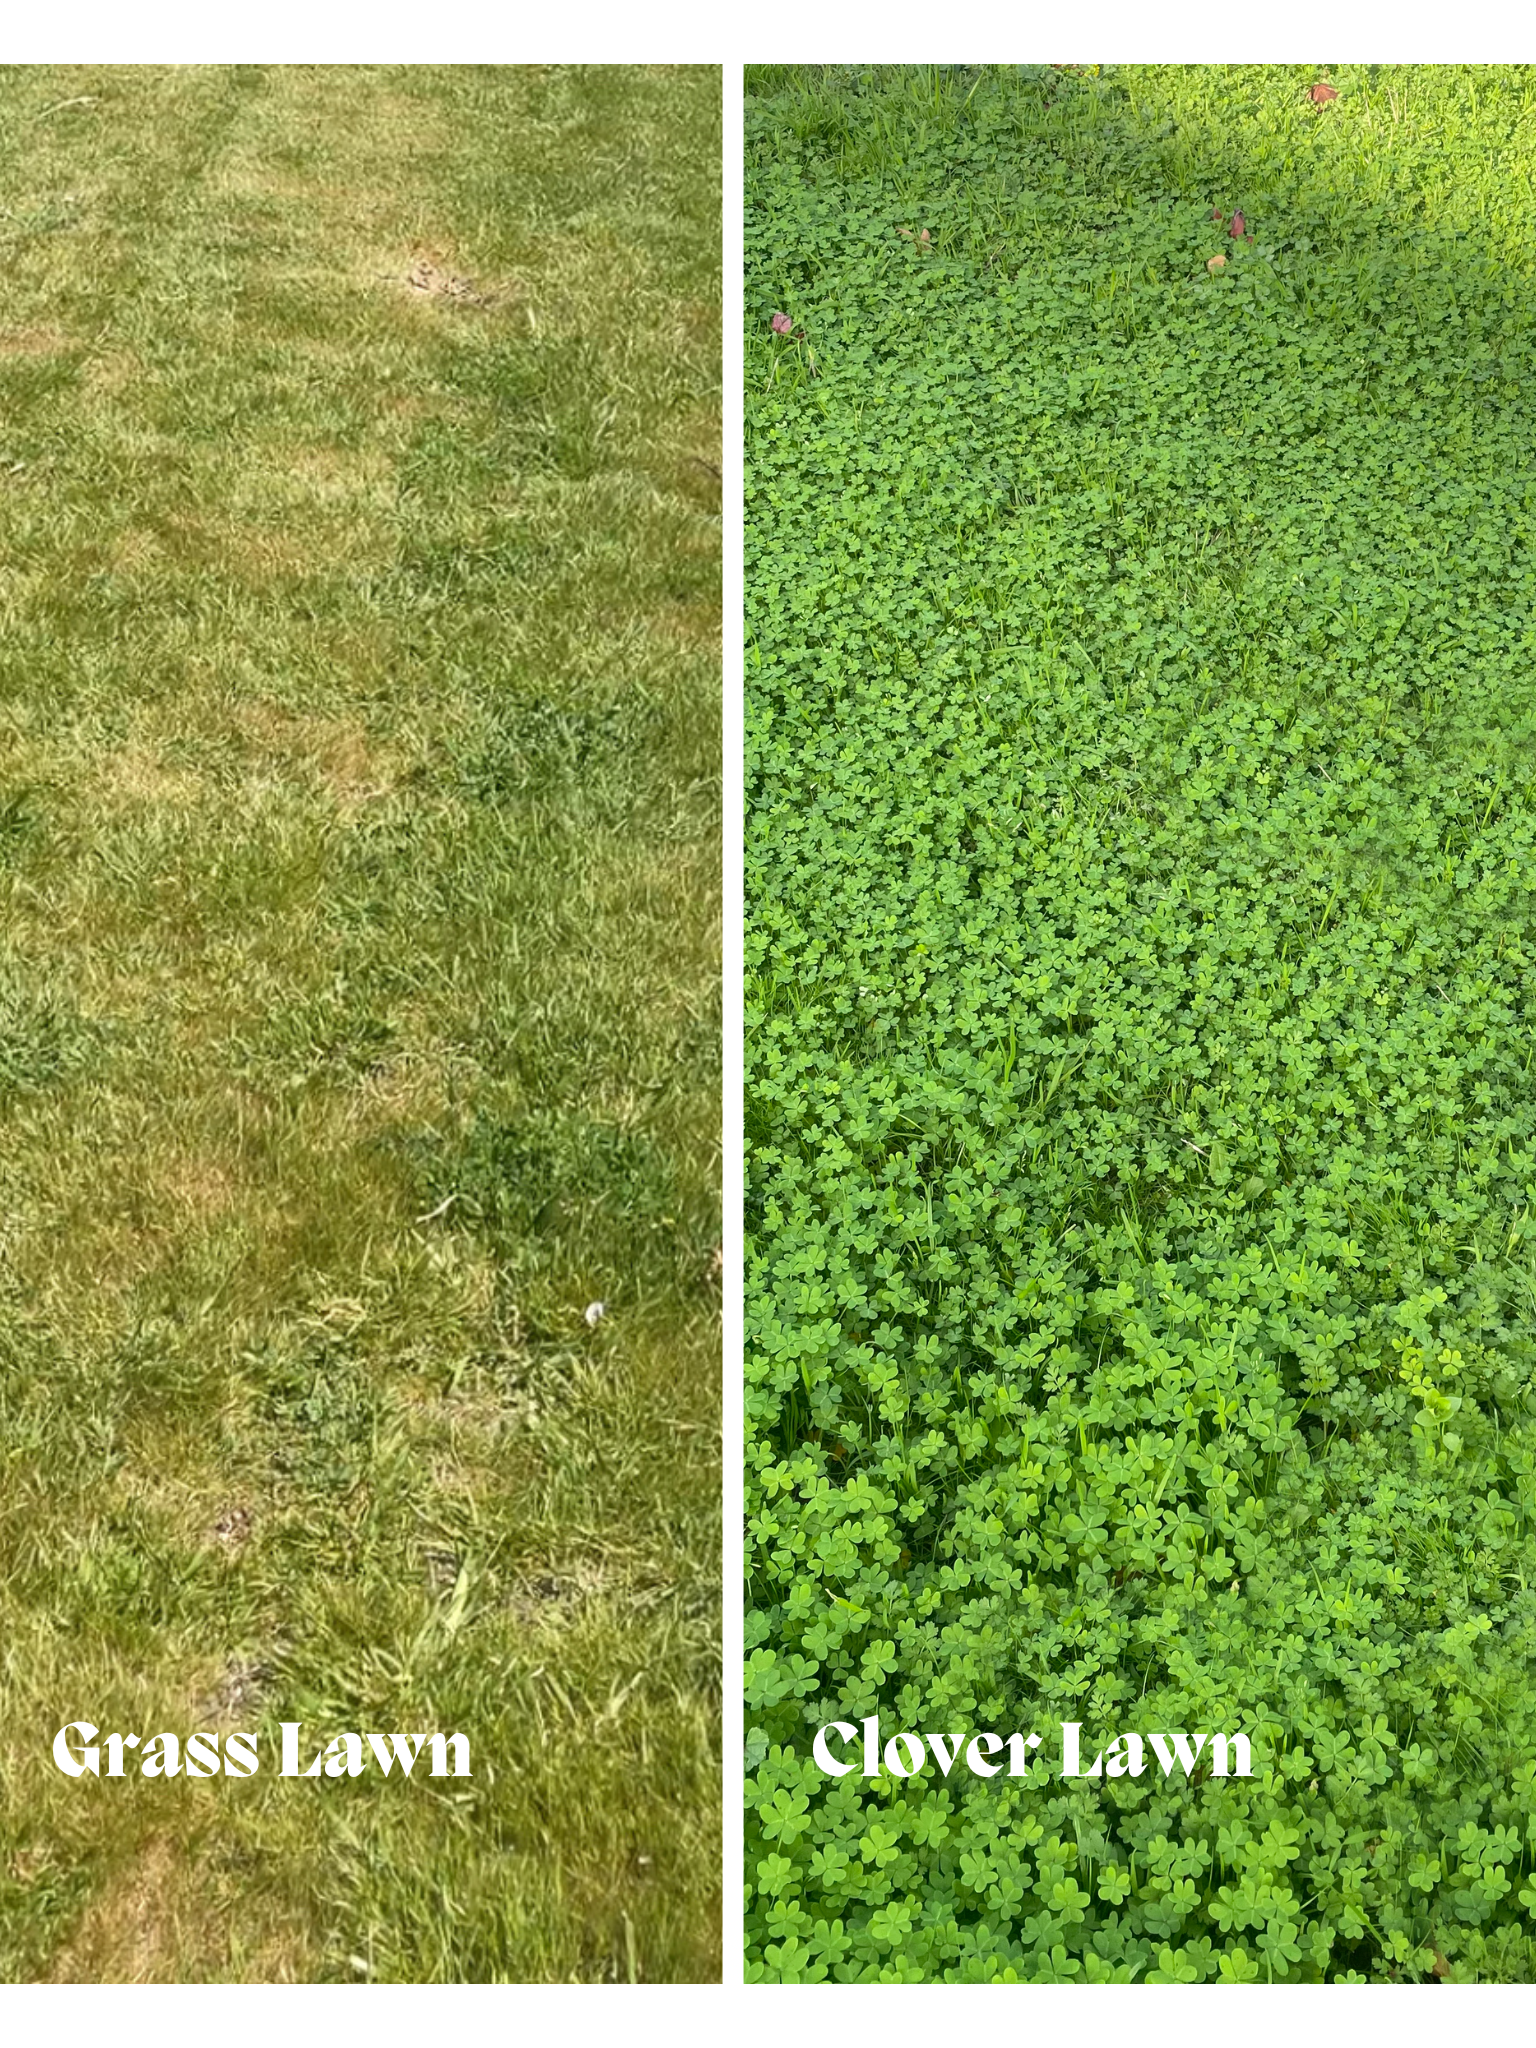
Image Source: xoxojackie.com
The Allure of a Clover Lawn
A clover lawn offers a beautiful, eco-friendly alternative to traditional grass. Instead of endless mowing and chemical treatments, imagine a lawn that stays green, requires less water, and even helps the soil. That’s the magic of clover! Planting white clover is a popular choice for homeowners looking for a low-maintenance, attractive, and beneficial ground cover. Let’s explore why clover is such a smart choice.
Clover Lawn Benefits: More Than Just Green
The advantages of a clover lawn are extensive, impacting everything from your wallet to the environment. Here’s a breakdown of the key benefits:
- Reduced Watering Needs: Clover has deep roots, allowing it to access moisture deeper in the soil. This means it stays greener for longer during dry spells, significantly reducing your need for frequent watering.
- Natural Fertilization: Clover is a legume, meaning it has a symbiotic relationship with beneficial soil bacteria. These bacteria live in nodules on the clover’s roots and convert nitrogen from the air into a form that plants can use. This process, called nitrogen fixation, naturally fertilizes your lawn, reducing or eliminating the need for synthetic fertilizers. This is a major plus for clover soil benefits.
- Weed Suppression: A dense clover lawn outcompetes many common weeds. Its vigorous growth and ability to fix nitrogen create a healthy environment where weeds struggle to take root and thrive.
- Attracts Pollinators: The small, white flowers of clover are a vital food source for bees, butterflies, and other beneficial pollinators. This contributes to a healthier local ecosystem.
- Durability and Resilience: Clover is surprisingly tough. It can withstand foot traffic and recovers quickly from damage. It also has a good tolerance for various soil conditions.
- Aesthetic Appeal: Many people enjoy the charming look of a clover lawn, with its bright green leaves and delicate white blooms. It offers a softer, more natural appearance than some monoculture grass lawns.
- Improved Soil Health: Beyond nitrogen, clover’s root system helps to aerate the soil and break up compaction. As the clover decomposes, it adds organic matter back into the soil, further enhancing its structure and fertility. These are significant clover soil benefits.
- Fewer Mowing Requirements: Because clover typically doesn’t grow as tall as many grasses, you’ll find yourself mowing less often. This saves time, energy, and reduces your carbon footprint.
- Drought Tolerance: As mentioned, clover’s deep root system makes it exceptionally drought-tolerant. It can often remain green and healthy when traditional grass turns brown and dormant during dry periods.
Types of Clover for Your Lawn
While there are many types of clover, some are more suited for lawn applications than others.
- White Clover (Trifolium repens): This is the most popular choice for lawns. It’s low-growing, spreads readily, and is very hardy. Varieties like ‘Regal’ and ‘Durability’ are specifically bred for lawn use, offering improved disease resistance and finer texture.
- Microclover: This is a smaller-leaved variety of white clover that creates a denser, finer-textured lawn. It’s becoming increasingly popular for its tidy appearance and reduced flowering.
- Red Clover (Trifolium pratense): While it has attractive large flowers, red clover is generally taller and less suitable for a typical lawn setting as it requires more frequent mowing and can become quite bushy.
How To Plant Clover Lawn: A Comprehensive Guide
Getting your clover lawn established is a rewarding process. Whether you’re starting from scratch or adding clover to an existing lawn, careful preparation and planting are key to clover establishment.
Preparing Your Area
The success of your clover lawn hinges on proper preparation. This stage is crucial for ensuring good seed-to-soil contact and creating an optimal environment for germination and growth.
Site Assessment
Before you even think about buying seed, take a good look at the area you plan to convert or overseed.
- Sunlight: Clover generally prefers full sun but can tolerate partial shade. Assess how much sunlight your lawn receives throughout the day.
- Soil Type: Clover is adaptable, but it performs best in well-draining soil. If you have heavy clay or very sandy soil, consider amending it.
- Existing Vegetation: Identify what you currently have in your lawn. Is it mostly grass? Are there many weeds? This will influence your preparation steps.
Soil Preparation Steps
Whether you’re establishing a new clover lawn or overseeding, preparing the soil is paramount.
- Clear the Area: If you’re starting a new lawn or converting a heavily weeded area, you’ll need to remove existing vegetation. You can do this by:
- Tilling: This breaks up the soil and incorporates organic matter.
- Smothering: Laying down cardboard or thick layers of newspaper over the area for several weeks can kill existing grass and weeds.
- Herbicides (Use with Caution): If you opt for herbicides, choose a non-selective one and follow application instructions precisely. Allow sufficient time for it to work and for any residues to dissipate before planting clover.
- Weed Removal: For overseeding, thoroughly remove as many weeds as possible. Hand-pulling is effective for larger weeds.
- Soil Testing: Consider getting a soil test. This will tell you the pH and nutrient levels of your soil. Clover prefers a slightly acidic to neutral pH (around 6.0-7.0). If your pH is too low, you may need to add lime. If it’s too high, sulfur can be used.
- Amend the Soil: Based on your soil test, amend the soil.
- Compost or Aged Manure: Adding organic matter improves drainage, water retention, and overall soil health. Spread a 1-2 inch layer over the area and lightly till it into the top 4-6 inches of soil.
- Fertilizer (Optional): If your soil test indicates a nutrient deficiency, you can add a starter fertilizer. Avoid high-nitrogen fertilizers, as clover produces its own nitrogen. A balanced fertilizer with phosphorus and potassium can be beneficial for root development.
- Rake and Level: Rake the area smooth to create an even surface. Remove any debris, rocks, or large clumps of soil. This step is essential for ensuring good seed-to-soil contact.
Planting Clover Seed: Your Options
There are two primary methods for planting clover: starting a new lawn or overseeding an existing one.
Method 1: Establishing a New Clover Lawn
This involves creating a clover-dominant lawn from scratch.
- Choose Your Clover Seed: Select a high-quality white clover seed, such as Microclover or a specific lawn variety.
- Determine Seeding Rate: The recommended seeding rate for white clover is typically around 0.5 to 1 pound per 1,000 square feet. Always check the specific recommendations on your seed package.
- Best Time to Plant: The ideal times for planting clover seed are early spring (after the last frost) or late summer/early fall (about 6-8 weeks before the first expected frost). This allows the seedlings to establish before extreme heat or cold sets in.
- Spreading the Seed:
- Broadcast Spreader: This is the easiest method for covering a large area evenly. If you’re planting a new lawn, you might want to divide the seed into two halves and spread one half in one direction (e.g., north-south) and the second half perpendicular to the first (e.g., east-west) to ensure uniform coverage.
- Hand Spreading: For smaller areas, you can simply scatter the seed by hand.
- Ensure Seed-to-Soil Contact: This is critical! Clover seed is small and needs to be in direct contact with the soil to germinate.
- Lightly Rake: After spreading the seed, lightly rake the area. You want to gently press the seed into the soil without burying it too deeply.
- Roll the Area: Use a lawn roller to press the soil and ensure good seed-to-soil contact. If you don’t have a roller, you can walk over the area or use a piece of plywood.
- Watering: Water the area gently but thoroughly. The soil should be kept consistently moist, but not waterlogged, until germination occurs. This may require light watering multiple times a day, especially in warm weather.
Method 2: Overseeding with Clover
This is a popular approach to improve an existing grass lawn by introducing clover.
- Timing is Key: The best time to overseed with clover is also early spring or late summer/early fall.
- Mow Low: Mow your existing lawn shorter than usual. This allows more light to reach the soil surface for the clover seeds.
- Aerate (Recommended): If your lawn is compacted, aerating the soil before overseeding will significantly improve seed germination and clover establishment. Aeration creates small holes in the soil, allowing seeds to fall into them and encouraging better root growth.
- Scarify or Dethatch: Lightly scarifying or dethatching the lawn can help create bare patches of soil for the clover seeds to make good contact with. You don’t want to scalp the grass, just roughen the surface.
- Spread the Clover Seed: Use a broadcast spreader for even distribution. The seeding rate for overseeding is typically lower than for a new lawn, around 0.25 to 0.5 pounds per 1,000 square feet.
- Rake Lightly: Gently rake the area to help the seeds settle into the grass and make contact with the soil.
- Watering: Water the lawn gently. Keep the seedbed consistently moist until germination, then reduce watering to encourage the clover’s deep root growth. Avoid heavy watering that could wash the seeds away.
Clover Establishment: What to Expect
Once you’ve planted your clover seed, patience is important.
- Germination Time: Clover seeds typically germinate within 7 to 14 days, depending on soil temperature, moisture, and light.
- First Mowing: Avoid mowing the newly established clover lawn for at least 3-4 weeks after germination. If you are overseeding, wait until the clover is about 3-4 inches tall. When you do mow, set your mower to a higher setting.
- Weeding: You might see some weeds germinate along with the clover. Hand-pull them if possible. As the clover establishes and thickens, it will naturally suppress weed growth.
- Flowering: White clover will produce small white flowers. If you prefer fewer flowers, consider using Microclover or mowing your lawn a bit more frequently at a higher setting.
Clover Lawn Care: Keeping It Thriving
Once your clover lawn is established, its maintenance is refreshingly simple. The goal of clover lawn care is to support its natural strengths rather than fighting against them.
Watering
As noted earlier, clover is drought-tolerant.
- New Seedlings: Keep the soil consistently moist until the plants are well-established.
- Established Lawns: Water deeply and infrequently, only when the lawn shows signs of stress (e.g., dulling color). This encourages the clover to send down deep roots, making it even more drought-resistant. You’ll likely find you water far less than you did with a traditional grass lawn.
Mowing
Mowing your clover lawn is less frequent and can be done at a higher setting.
- Height: Aim to mow at a height of 3-4 inches. This promotes thicker growth and helps the clover outcompete weeds.
- Frequency: You’ll notice you need to mow much less often.
- Clippings: It’s generally beneficial to leave the grass clippings on the lawn. They decompose and return nutrients to the soil.
Fertilizing
The beauty of clover is its ability to fertilize itself.
- No Need for High-Nitrogen Fertilizers: Because clover fixes nitrogen, applying high-nitrogen lawn fertilizers can actually be detrimental. It can encourage the grass in your lawn to grow too vigorously and outcompete the clover.
- Occasional Boost (Optional): If your soil is deficient in phosphorus or potassium, a light application of a balanced fertilizer (without high nitrogen) in the fall can be beneficial for overall plant health and root development.
Weed Control
A healthy, dense clover lawn is your best defense against weeds.
- Encourage Density: Proper mowing and watering practices will help the clover form a thick mat that smothers potential weeds.
- Hand-Pulling: For any persistent weeds that do pop up, hand-pulling is the most effective and eco-friendly method.
Pest and Disease Management
Clover is generally quite resistant to most common lawn pests and diseases. Its natural resilience is one of its biggest advantages.
Transitioning to a Clover Lawn: Considerations
If you’re looking to transition your entire lawn to clover or incorporate it significantly, here are some important things to keep in mind.
Overseeding with Clover to Replace Grass
This is a common and effective strategy. Over time, as you overseed with clover, the clover will gradually start to dominate the lawn, reducing the amount of grass.
Managing the Mix of Grass and Clover
Many people enjoy a lawn that is a mix of grass and clover. This combination offers many of the benefits of a pure clover lawn while retaining the traditional appearance of grass.
- Nutrient Cycling: The clover continues to fertilize the grass, leading to a healthier, greener lawn overall.
- Traffic Tolerance: The clover can help fill in bare spots that might occur in a grass-only lawn due to heavy foot traffic.
Aesthetics and Flowering
Some homeowners are concerned about the flowers that clover produces.
- Frequency of Mowing: Mowing at a higher setting (3-4 inches) more frequently can keep the flowers mowed down.
- Microclover: As mentioned, microclover varieties have significantly reduced flowering.
Troubleshooting Common Clover Lawn Issues
While clover is low-maintenance, occasional issues might arise.
Clover Not Germinating
- Poor Seed-to-Soil Contact: Ensure the seeds were pressed into the soil.
- Insufficient Moisture: The soil must be kept consistently moist during germination.
- Incorrect Planting Time: Avoid planting during extreme heat or cold.
- Seed Quality: Use fresh, high-quality seed.
Clover Appears Yellow or Stunted
- Lack of Nitrogen (Rare): While clover fixes nitrogen, in very young seedlings or if the soil is extremely deficient, a light application of a starter fertilizer might help. However, more often, this is a sign of another issue.
- Compacted Soil: Aeration can help if the soil is too compacted.
- Drought Stress: Even drought-tolerant plants need water during prolonged dry spells.
- Disease: While uncommon, certain fungal diseases can affect clover. Ensure good air circulation and avoid overwatering.
Excessive Flowering
- Mowing Height: Try mowing at a slightly lower, but still acceptable, height of around 3 inches if you want to reduce flowering.
- Variety Choice: If flowering is a major concern, consider planting a microclover variety.
Frequently Asked Questions About Clover Lawns
Q1: Can I plant clover seed in the fall?
Yes, the best time to plant clover seed is typically early spring or late summer/early fall (about 6-8 weeks before the first frost). Fall planting allows the clover to establish a good root system before winter.
Q2: How much water does a clover lawn need?
Established clover lawns are very drought-tolerant and require minimal watering. Water only when the lawn shows signs of stress. Newly planted clover seeds need consistently moist soil until they germinate and are established.
Q3: Will clover choke out my grass?
Clover is a good competitor and can gradually thicken to reduce the amount of grass in your lawn over time, especially if you overseed regularly. However, a mix of grass and clover is often desirable and beneficial.
Q4: Is clover a weed?
No, clover is not considered a weed in the context of a lawn. It’s a beneficial plant that offers numerous advantages, such as nitrogen fixation and attracting pollinators. While some may not like its appearance, it’s a valuable addition to a healthy lawn ecosystem.
Q5: How long does it take for clover to establish?
Clover seeds typically germinate within 1-2 weeks. It will take several weeks to a few months for the clover to establish a dense ground cover.
Q6: Do I need to fertilize a clover lawn?
No, clover is a legume and fixes its own nitrogen from the air, acting as a natural fertilizer for itself and surrounding grasses. You typically do not need to fertilize a clover lawn, and avoiding high-nitrogen fertilizers is often recommended to prevent encouraging grass over clover.
Q7: How often should I mow a clover lawn?
You should mow clover less often than traditional grass lawns, typically when it reaches about 3-4 inches in height. Mowing at this height and leaving the clippings can help return nutrients to the soil.
By following these guidelines, you can successfully plant and maintain a beautiful, eco-friendly clover lawn that benefits your property and the environment. The journey to clover establishment is straightforward, and the rewards of clover lawn care are substantial. Enjoy your lush, green, and sustainable ground cover!